
For users of the Windows and Mac operating systems, the installation of new fonts can be an effortless and unambiguous process. In this instructional article, we will lead you through a comprehensive, step-by-step guide on how to install fonts on both Windows and Mac.
Regardless of whether you’re a creative professional, writer, or simply an enthusiast who loves experimenting with typography, this guide will enable you to enhance the quality of your work by providing you with the necessary knowledge on how to install fonts on your computer.
How to Install Fonts on Windows 10
Windows 11 or 10 comes with a pre-installed set of fonts, and you can download others from the Microsoft Store or Apple Store and other online sources. Here is how to install fonts on Windows:
Step 1: Download the Font
First, you need to download the font you want to install. You can get fonts from many sources, including the Microsoft Store, Apple Store, and various online websites.

Ensure that the font file is in .ttf (TrueType Font) or .otf (OpenType Font) format. If the file comes compressed in .zip or .rar format, you will need to extract the font file before installing it.
Step 2: Extract the Font
To extract the font, right-click the compressed file, select “Extract All,” and choose the destination where you want to decompress the files. Once the extraction process is complete, the font files will be available in a new folder.

Step 3: Install the Font
To install the font, right-click the font file or select all the fonts you want to install and click “Install” from the menu. The font will be added to your computer, and you can use it in any program that allows you to select the font.
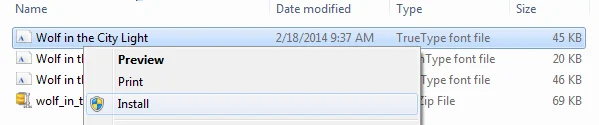
There are a few other ways to install the font. One option is to open the font file and select the “Install” button in the preview window. Another option is to search for “Fonts” in the “Start” menu and then drag or copy and paste the font files. Finally, you can navigate to the “Fonts” file by going to Control Panel > Appearance and Personalization > Fonts.
How to Install Fonts on Mac
Installing fonts on a Mac can be a simple process that can enhance your design and creative projects. Whether you are looking to add a new font to your collection or need to install a specific font for a project, the steps are straightforward and easy to follow.
Step 1: Download the Font File
The first step is to download the font file you want to install. Fonts can be downloaded from a variety of sources on the internet, but it’s essential to ensure that you are downloading from a reputable site to avoid any potential malware or viruses.
Fonts are typically available in either .ttf (TrueType font) or .otf (OpenType font) format. These two font types are compatible with most applications on Mac, including Microsoft Word, Adobe Photoshop, and Adobe Illustrator.
Step 2: Open the Font File
Once the font file has been downloaded, double-click on the file to open it. This action will open a preview window displaying the font. In this preview window, you will be able to view how the font looks, including the different styles, sizes, and weights.
Step 3: Install the Font
To install the font, click the “Install” button located in the preview window. After clicking the install button, the font will be installed and made available for use in all applications on your Mac.
If you prefer a different method, you can also install a font by dragging the font file into the “Fonts” folder in your “Library” folder. This folder can be found by opening a Finder window and clicking on the “Go” menu, followed by selecting “Go to Folder.” In the pop-up window, type “~/Library/Fonts” and hit the “Go” button.
Step 4: Unzipping Compressed Font Files
Some font files may come in a compressed format such as .zip. If this is the case, you will need to unzip the file before installing the font. To do this, double-click on the compressed file to open it. Then, drag the font file(s) out of the window and into the “Fonts” folder in your “Library” folder.
Conclusion
Installing fonts on Windows or Mac is a straightforward process that can be done in just a few steps. By following these steps, you can quickly add new fonts to your collection and make them available for use in your creative projects. Remember to always download fonts from reputable sources to ensure that you are not downloading any potential malware or viruses.
How to Import Custom Fonts in CapCut
How to Add Fonts to Cricut Design Space